
2019年11月25日 星期一
2019年11月21日 星期四
git linkedin learning
git history
https://gitbook.tw/interview
首先幾個cmd操作
在cmd有大篇幅的內容,而想向下或向上移動時可按b (back)或space bar = f (forward)
ls -la .git // 列出.git下的檔案資料
cat .git/HEAD // 查看.git/HEAD的內容,查看目前HEAD標籤指向的位置
ref:ref/heads/master(叫你參考這個檔案)
cat .git/refs/heads/master
4135fc4add3332e25ab3cd5acabe1bd9ea0450fb //這個即為目前HEAD的指向

source code control system(SCCS)
最初的版控 (存最初(init)的和後面更動(update)的)
revision control system(RCS)
儲存的方式改成存整個,這樣更快速,但到目前為止,只能追蹤單一檔案,而非一個project
concurrent versions system(CVS)
可追蹤多個檔案,並且可以多人同時在同一個file工作(concurrent),並有了remote repository
Apache Subversion(SVN)
improve remote repository, 更快速且可存non-text files, like images,又此時開始可以追蹤整個project的變化,比如修改directory的名稱, 刪除directory, 新增,....
BitKeeper SCM
a closed source proprietary(所有權) source code management(SCM) tool
it's a distributed version tool
Git
open source
distributed version tool
- different users (or teams of users) maintain their own repositories, instead of working from a central repository.
- tracks changes, not versions (在此之前是一個一個version做不同的儲存,但Git是將不同處以change sets or patches的形式儲存). Changes sets can be exchanged between repositories. No single master repository, just many working copies. Each with their own combination of change sets.
that's say we're not trying to keep up-to-date with the latest version of something instead do we have a change set applied or not?
-not as useful for tracking non-text files, like images, movies, music, fonts. Because we can't see the different between the new one and the old one clearly. And not working well with the files that need to be interpreted by an application, like PDF, PSD...without interpreting, they're just a bunch of letters and numbers that Git won't understand.
there are three places to store git configuration information (配置訊息)
https://gitbook.tw/interview
首先幾個cmd操作
在cmd有大篇幅的內容,而想向下或向上移動時可按b (back)或space bar = f (forward)
ls -la .git // 列出.git下的檔案資料
cat .git/HEAD // 查看.git/HEAD的內容,查看目前HEAD標籤指向的位置
ref:ref/heads/master(叫你參考這個檔案)
cat .git/refs/heads/master
4135fc4add3332e25ab3cd5acabe1bd9ea0450fb //這個即為目前HEAD的指向
source code control system(SCCS)
最初的版控 (存最初(init)的和後面更動(update)的)
revision control system(RCS)
儲存的方式改成存整個,這樣更快速,但到目前為止,只能追蹤單一檔案,而非一個project
concurrent versions system(CVS)
可追蹤多個檔案,並且可以多人同時在同一個file工作(concurrent),並有了remote repository
Apache Subversion(SVN)
improve remote repository, 更快速且可存non-text files, like images,又此時開始可以追蹤整個project的變化,比如修改directory的名稱, 刪除directory, 新增,....
BitKeeper SCM
a closed source proprietary(所有權) source code management(SCM) tool
it's a distributed version tool
Git
open source
distributed version tool
- different users (or teams of users) maintain their own repositories, instead of working from a central repository.
- tracks changes, not versions (在此之前是一個一個version做不同的儲存,但Git是將不同處以change sets or patches的形式儲存). Changes sets can be exchanged between repositories. No single master repository, just many working copies. Each with their own combination of change sets.
that's say we're not trying to keep up-to-date with the latest version of something instead do we have a change set applied or not?
-not as useful for tracking non-text files, like images, movies, music, fonts. Because we can't see the different between the new one and the old one clearly. And not working well with the files that need to be interpreted by an application, like PDF, PSD...without interpreting, they're just a bunch of letters and numbers that Git won't understand.
there are three places to store git configuration information (配置訊息)
- System level config: 系統默認配置,所有使用這台電腦的人都會接收這個配置,最少用的
/etc/gitconfig // Unix OS
Program Files\Git\etc\gitconfig // window OS
cmd: git config --system - User level config: 使用者配置,最常使用的
~/.gitconfig
$HOME\.gitconfig
cmd: git config --global , it means "global to user",
like git config --global user.name "Alice"
like git config --global user.email "Alice@xxx.com"
如果想看設定,則...
git config --list // 印出全部配置資料
git config user.name // Alice
git config --global core.editor "notepad.exe" // 設定編輯器
git config --global color.ui true - Project level config: project配置
my_project/.git/config
cmd: git config
cmd:
cd ~ // to your user directory (回到根目錄)
ls -la (window 似乎是dir -la?) // 列出當前目錄的所有檔案,此時(假設是unix os)可以看見.gitconfig
cat .gitconfig // 看見該文檔內容?總之可以看見配置設定
ls la ~ // 列出根目錄的所有檔案
關於commit的描述規則與建議
example:
ls la ~ // 列出根目錄的所有檔案
關於commit的描述規則與建議
- 短且單行描述summary(50字內)
- 可選擇性地用底線做一個較完整的描述(不能用空白)
- 少於72 characters
- 用現在式
"Fix for a bug" or "Fixes a bug" not "fixed a bug" - 要點經常用星號或dash
- 可以加入相關的bug或request號碼
- 可以自己發展一套規則,如 [css,js]xxx 或 bugfix: 或#23422 - xxx
example:
- Bad: "Fix typo"
- Good: "Add missing hyphen in project section of HTML"
- Bad: "Update login code"
- Good: "Change user authentication to use Blowfish"
- Bad: "Updates member report,
we should discuss if this is right next week"
- ghi4353 - Fixes bug in admin logout // ghi mean "github issue"
When an admin logged out of the admin area, they could not log in to the members area because their session[:user_id] was still set to the admin ID.
This patch fixes the bug by setting session[:user_id] to nil when any user logs out of any area.
有為什麼做這個commit,有做了什麼,我們應該習慣這樣做
git log -n 5 // 顯示最新的五個log
git log --since=2019-01-01 // 顯示自2019-01-01 到現在的log
等同git log --after=2019-01-01
git log --until=2020-01-01 // 顯示自現在到2020-01-01的log
等同git log --before=2019-01-01
git log --since="2 weeks ago" --until="3 days ago"
git log --since="2.weeks" --until="3.days"
git log --author="Kevin"
git log --grep="Init" // grep means "Globally search for Regular ExPressions",針對commit meassage搜索
git log --grep="Bugfix"
git log --grep="ghi"
git log 284dede..56a2e3(列出兩個SHA1之間的log)( .. called range operator)
git log xxx.html // give the logs that affect xxx.html
git log -p // it shows a diff of what actually changed in each of these.(可以搭配其他指令,像是指定檔案,更實用)
git log --stat --summary // 列出git status about every log, but no commit message
git log --format=oneline // 同git log --oneline 但顯示full SHA1
git log --format=short // 列出SHA1, author, commit message
git log --format=medium // 再加上Date, and this is default
git log --format=full // 再加上Commit, it means "commit author", it may differ from author, but no Date
git log --format=fuller // 再加上CommitData, AuthorDate
git log --format=email // 這個會顯示的像是email的排版
 git log --format=raw // but i think it's not useful and not important
git log --graph // 會列出線圖
git log --oneline --graph --all --decorate // 會列出資訊簡潔的線圖,
其中
--all,指“顯示所有的branch”。
--decorate,指“顯示每个提交关联的分支或者标签很有用”
git log <branch> //列出特定branch的log
three trees :
git diff // compare the staging area and working directory
git diff --staged //compare the repository and the staging tree (在舊版的git裡有--cached,目前他的作用和 --staged一樣了)
git diff 4135fc4 // 顯示那個commit和現在的working directory 的不同,可以配上指定的檔案, "git diff 4135fc4 xxx.html"
git rm xxx.txt // 刪除xxx.txt,不用到資料夾去做刪除的動作,此時他就已經刪除且同時做了git add xxx.txt的動作!
rename a file, git first list them as a delete and a new one, after add them to the staging, git find them more than 50% identical, then git will call them "rename"
在git中,move file 和 rename file 是做同樣的事,因為同樣都是修改path,而且檔案內容一致
git mv second_one.txt secondary.txt // mv means "move",如此重新命名了檔案
而在git status中他會被顯示為renamed: 狀態

PS: If there is a .DS_store, then we can ignore it, because that is what Macintosh uses to keep track of positions in the finder.
Tracking a existing project, we always use commit message "Initial Commit"
-S // 在cmd程式編輯模式(a saying is "paginator")中,用dash+大寫S可以切換顯示方式自動換行(wrapping the lines)或不換行(chopping the lines)
it just trails off and goes way past the edge of the screen 它会逐渐消失并超出屏幕边缘 (這句是要學英文用...)
git diff --color-words // this will show you what exactly changed (這會縮小改變到字,而不是以行區分)
git commit -a -m "xxx"
// 這個指令就像git add . + git commit -m "xxx",但是他不會處理 untracked files !!
// 可以縮寫成-am
git show 4135fc4a (any SHA-1) // it shows the diff about that SHA-1,並且它可以再配合 --color-words使用
git diff 4135fc4(隨便一個比較早的SHA1)..dc3344(隨便一個比較晚的SHA1,或是HEAD) // 比較兩個commit 之間的差異,用..連結,SHA1可以跨branch使用,跨tag..任何可以塞選出兩個不同commit者都可以用這個方法做比較
PS: tag,有附註標籤主要用來做像是軟體版號之類的用途,而輕量標籤則是用來個人使用或是暫時標記用途。簡單的說,有附註標籤的好處就是有更多關於這張標籤的資訊,例如是誰在什麼時候貼這張標籤,以及為什麼要貼這張標籤。所以如果你不是很在乎這些資訊,用一般的輕量標籤也是沒什麼問題。
配上--stat --summary 也不錯
there is still a option, "--ignore-space-change", same as "-b"
there is still a option, "--ignore-all-space", same as "-w" (任何會產出space的都忽略)
commit mutiple lines massage
Type "git commit -a" and then enter, it'll open editor and you can type any thing in that. The best convention is type a title in first line, then give it a blank bar, finally start to type the detail in the third line.
git log --oneline // can get the only one line about every commit
make atomic commits // 製作像元素一樣小的commit,每個commit只影響一個功能,讓人看見commit可以快速知道它的作用
git checkout -- index.html //拿出同一個branch的index.html,放棄在該檔案的修改 (尚在working directory階段),則原本git status 有modified紀錄的會被清空
其中 -- 表示在同一分支,而不是要拿出其他分支!
git checkout -- . // 這代表要放棄全部修改
git reset HEAD xxx.html // 放棄在該檔案的修改 (在staging階段),則原本git status 在staging的行為會被轉到modified紀錄
git commit --amend -m "new message" // 把目前staging的和最新一個commit結合在一起(最新一個commit會移除)成為新的commit (amend 修改),也可以僅僅用來修改最新一個的commit message
git checkout 4135fc4a -- xxx.html // 退回的那個commit的時候
git checkout e6cabe6353cc0 -- src/components/home/Table.vue
注意如果不加後面的指定file,將只會是“移動HEAD標籤”而已
git revert 4135fc4a // 會變成那個SHA1的狀態,建立一個新的commit(不改變歷史紀錄)並開啟編輯器,可以重新會開啟編輯器,可以重新編輯訊息。
當要修改某一個commit時(不一定是最新一個),很適合用這個
git reset HEAD xxx.txt // 將 xxx.txt 移出暫存區
git reset(All this did was moved the HEAD pointer that other commit was still there)
問:試說明
git clean // it would remove everything that is untracked (meaning that it is not in the repository or in the staging tree), and because it is a very destructive action, so it must use with options, which show below.
-n // it lists what files would be removed, don't do the action
-f // it do the action
ideas on what to ignore?
如果只有經常在多個專案中只有自己操作,也許會想把.gitignore寫在global中針對特定user
此時可用
git config --global core.excludesfile ~/.gitignore_global
關於~/.gitignore_global的位置與此檔案的命名都是隨意的,但建議在user directory底下同此命名
git rm --cached db_config.txt 從repository中刪除 (用在先追蹤的file,後來要ignore)


Track empty directory
tree-ish, a reference to a commit, something that points out a commit, so how to reference a commit? (取得commit的位址)


branch
從master branch創建一個新的分支second_branch,但在新的分支上沒有commit,則即使已經在新的branch上工作,HEAD pointer仍然只像master上的最新commit。
git diff master..second_branch // this differ between the tip of master and the tip of second_feature(描述性說法就是顯示second_branch做了什麼)
git diff master..second_branch^ // this differ between the tip of master and the second tip of second_feature
git branch --merged // 會顯示有merge到當前branch的分支,換句話說,如果在這個分支的commit裡可以找到xxx分支的最新commit,那xxx就會出現在這個cmd結果裡,如果merge過來的分支繼續進行commit,那將不會出現在這裡
git branch --no-merged
git branch -r --merged //查詢remote 裡merged的
git branch --merged HEAD/<branch>/<SHA1> // 查詢特定branch的merged紀錄
git branch -m(或--move) second_feature seo_title // rename branch
git branch -d(或--delete) seo_title // delete branch (注意不能在該分支上刪除該分支)
git branch <new_branch> <remote_branch> //建立新分支追蹤remote branch
同
git checkout -b <new_branch> <remote_branch>
git branch <new_branch> HEAD // 從HEAD pointer建立新分支
merge
git merge --no--ff branch // means "no fast-forward", make a new commit anyway, 當想要留有merge的痕跡時用這個
git merge --ff-only branch // means "If you can't do a fast-forward merge, then just abort"
stash
It's not part of the repository, the staging index or the working directory, it's a special fourth area in Git, seperate from the others.
git stash save "key in stash message, anything you want" // 這個訊息只要給自己看得懂就好,接著working directory and staging index會回到最新的commit,就像git reset hard HEAD.
git stash list // to view what is in the stash,and it can be saved on branch_1, then pull out in branch2
result:
stash@{0}: On feature/chart: edit one line
stash@{1}: On master: Enter
stash@{2}: WIP on fix-token-conflict: 01292c3 Merge branch 'feature/change-deploy-flow' into 'master'
git show stash@{0} // show detailed info
git show -p stash@{0} // show more detailed info (like diff)
but actually when i try the two above, i get the same result.
git stash pop // retrieve the stash, and remove it from the stash
git stash apply // retrieve the stash, and leave it in the stash
if you want to pull the newest one, then you don't key stash@{0} as well.
git stash drop stash@{0} //刪除指定的stash
git stash clear //刪除全部的stash
remote
git remote // 列出remote資訊
git remote -v // 列出更詳細的remote資訊
git remote add <alias> <url> //添加remote
git remote rm <alias> //刪除remote
git push -u <alias> <branch> // -u means "track the remote", so when key "cat .git/config", then we can see [branch "master"]
 其中的[branch "master"] 是指該分支的remote被設定在origin的位置
如果要讓existing untracking branch變成tracking:
git push <alias> :<remote_branch_name> // delete a remote branch
實際上是git push <alias> <local_branchName>:<remote_branchName> 這個是push local branch to remote branch,結果把local branch拿掉,就變成,把nothing push to remote branch所以就變成delete
like ..
git push origin :master // notice! Not origin/master, just master!
還有另一個delete way, this is more intuitive
git push <alias> --delete <remote_branch_name>
"git push origin master" will push any changes in the origin/master branch to the origin repository.
"git fetch origin master" will fetch the remote to origin/master
origin/master is a local remote-tracking branch created by git, it's different from master in local until we do merge.
Q: Use this command to tell your local repository where it can find the remote repository.
A: git remote add nameofRepo URL.
git branch -r // show you the remote branches
git branch -a //show you local and remote branches
git clone <https url> <name> //clone and rename the folder, and "clone" will track the remote branch
Prune
Pruning means delete all stale remote-tracking branches, like "origin/Bugfix:xxx".


git log -p // it shows a diff of what actually changed in each of these.(可以搭配其他指令,像是指定檔案,更實用)
git log --stat --summary // 列出git status about every log, but no commit message
git log --format=oneline // 同git log --oneline 但顯示full SHA1
git log --format=short // 列出SHA1, author, commit message
git log --format=medium // 再加上Date, and this is default
git log --format=full // 再加上Commit, it means "commit author", it may differ from author, but no Date
git log --format=fuller // 再加上CommitData, AuthorDate
git log --format=email // 這個會顯示的像是email的排版
git log --graph // 會列出線圖
git log --oneline --graph --all --decorate // 會列出資訊簡潔的線圖,
其中
--all,指“顯示所有的branch”。
--decorate,指“顯示每个提交关联的分支或者标签很有用”
git log <branch> //列出特定branch的log
three trees :
- repository(tracked)
- staging index(be about to track)
- working directory(not track yet)
Has Values (SHA-1), 除了受到code的影響,還有他的 author, commit message, parent SHA-1
- Git generates a checksum for each change set.
- Checksum algorithms convert data into a simple number.
- Same data always equals same checksum.
- Data integrity is fundamental.
- Changing data would change checksum
- Git uses SHA-1 hash algorithm to create checksums.
- 40-character hexadecimal string(0-9,a-f)
- Example: 4135fc4add3332e25ab3cd5acabe1bd9ea0450fb
PS: checksum means "a digit representing the sum of the correct digits in a piece of stored or transmitted digital data, against which later comparisons can be made to detect errors in the data".
HEAD 總是指向最新的操作
git diff // compare the staging area and working directory
git diff --staged //compare the repository and the staging tree (在舊版的git裡有--cached,目前他的作用和 --staged一樣了)
git diff 4135fc4 // 顯示那個commit和現在的working directory 的不同,可以配上指定的檔案, "git diff 4135fc4 xxx.html"
git rm xxx.txt // 刪除xxx.txt,不用到資料夾去做刪除的動作,此時他就已經刪除且同時做了git add xxx.txt的動作!
rename a file, git first list them as a delete and a new one, after add them to the staging, git find them more than 50% identical, then git will call them "rename"
在git中,move file 和 rename file 是做同樣的事,因為同樣都是修改path,而且檔案內容一致
git mv second_one.txt secondary.txt // mv means "move",如此重新命名了檔案
而在git status中他會被顯示為renamed: 狀態

PS: If there is a .DS_store, then we can ignore it, because that is what Macintosh uses to keep track of positions in the finder.
Tracking a existing project, we always use commit message "Initial Commit"
-S // 在cmd程式編輯模式(a saying is "paginator")中,用dash+大寫S可以切換顯示方式自動換行(wrapping the lines)或不換行(chopping the lines)
it just trails off and goes way past the edge of the screen 它会逐渐消失并超出屏幕边缘 (這句是要學英文用...)
git diff --color-words // this will show you what exactly changed (這會縮小改變到字,而不是以行區分)
git commit -a -m "xxx"
// 這個指令就像git add . + git commit -m "xxx",但是他不會處理 untracked files !!
// 可以縮寫成-am
git show 4135fc4a (any SHA-1) // it shows the diff about that SHA-1,並且它可以再配合 --color-words使用
git diff 4135fc4(隨便一個比較早的SHA1)..dc3344(隨便一個比較晚的SHA1,或是HEAD) // 比較兩個commit 之間的差異,用..連結,SHA1可以跨branch使用,跨tag..任何可以塞選出兩個不同commit者都可以用這個方法做比較
PS: tag,有附註標籤主要用來做像是軟體版號之類的用途,而輕量標籤則是用來個人使用或是暫時標記用途。簡單的說,有附註標籤的好處就是有更多關於這張標籤的資訊,例如是誰在什麼時候貼這張標籤,以及為什麼要貼這張標籤。所以如果你不是很在乎這些資訊,用一般的輕量標籤也是沒什麼問題。
配上--stat --summary 也不錯
there is still a option, "--ignore-space-change", same as "-b"
there is still a option, "--ignore-all-space", same as "-w" (任何會產出space的都忽略)
commit mutiple lines massage
Type "git commit -a" and then enter, it'll open editor and you can type any thing in that. The best convention is type a title in first line, then give it a blank bar, finally start to type the detail in the third line.
git log --oneline // can get the only one line about every commit
make atomic commits // 製作像元素一樣小的commit,每個commit只影響一個功能,讓人看見commit可以快速知道它的作用
git checkout -- index.html //拿出同一個branch的index.html,放棄在該檔案的修改 (尚在working directory階段),則原本git status 有modified紀錄的會被清空
其中 -- 表示在同一分支,而不是要拿出其他分支!
git checkout -- . // 這代表要放棄全部修改
git reset HEAD xxx.html // 放棄在該檔案的修改 (在staging階段),則原本git status 在staging的行為會被轉到modified紀錄
git commit --amend -m "new message" // 把目前staging的和最新一個commit結合在一起(最新一個commit會移除)成為新的commit (amend 修改),也可以僅僅用來修改最新一個的commit message
git checkout 4135fc4a -- xxx.html // 退回的那個commit的時候
git checkout e6cabe6353cc0 -- src/components/home/Table.vue
注意如果不加後面的指定file,將只會是“移動HEAD標籤”而已
git revert 4135fc4a // 會變成那個SHA1的狀態,建立一個新的commit(不改變歷史紀錄)並開啟編輯器,可以重新會開啟編輯器,可以重新編輯訊息。
當要修改某一個commit時(不一定是最新一個),很適合用這個
git reset HEAD xxx.txt // 將 xxx.txt 移出暫存區
git reset(All this did was moved the HEAD pointer that other commit was still there)
- soft --does not change staging index or working directory
- mixed(default) --changes staging index to match repository, does not change working directory
- hard --changes staging index and working directory to match repository
問:試說明 git checkout SHA1、git reset SHA1 以及 git revert SHA1 這三個指令有什麼不同?
git checkout SHA1
這個指令會把目前的
HEAD 移到指定的 commit 上,並且把目前的狀態變成那個 commit 時候的樣子,但是不會移動任何分支(也就是分支都停在原來的地方,只有 HEAD 移動而已)。
因此,整個歷史紀錄看起來並沒有什麼變化,只是
HEAD 暫時移到某個地方而已。
git reset SHA1
這個指令會把目前的
HEAD 跟分支都一起移到指定的 commit 上,同時會根據後面追加的參數(常見的有 --mixed、--soft 跟 --hard),會決定原本那些 commit 的檔案跟目錄的去留。使用預設的 --mixed 會把檔案留在工作目錄,使用 --soft 會把檔案跟目錄留在暫存區,而使用 --hard 則會把拋棄這些變化。
而不管是哪個參數,不只是
HEAD 的位置變了,整個歷史紀錄看起來也會有變化(變短或變長都有可能)。
git revert SHA1
這個指令會產生一個新的 commit,而這個 commit 的目的就是去取消(或該說是 undo)某些 commit 做的事情。
因為本質上還是 commit,所以整個 Git 的歷史紀錄不會變短,只會越 revert 越長。
git clean // it would remove everything that is untracked (meaning that it is not in the repository or in the staging tree), and because it is a very destructive action, so it must use with options, which show below.
-n // it lists what files would be removed, don't do the action
-f // it do the action
ideas on what to ignore?
- Compiled source code(編譯後的檔案,像vue編譯後生成的js)
- Packages and compressed files (像node_modules, zip)
- Logs and databases (因為太常變動)
- Operating system generated files(像 .DS_Store)
- User-uploaded assets(像images, PDFs, video)
如果只有經常在多個專案中只有自己操作,也許會想把.gitignore寫在global中針對特定user
此時可用
git config --global core.excludesfile ~/.gitignore_global
關於~/.gitignore_global的位置與此檔案的命名都是隨意的,但建議在user directory底下同此命名
git rm --cached db_config.txt 從repository中刪除 (用在先追蹤的file,後來要ignore)
Track empty directory
- Add dot file, like ".gitkeep", it's a convention to call in a empty directory
- Use cmd "touch temp/.gitkeep"
- SHA-1 hash (事實上SHA1並不是唯一的,但是要有兩個指向同一個SHA1需要像天文學般龐大的基數才有可能)
- HEAD pointer
- branch reference, tag reference
- ancestry, a caret -- ^, a tilde -- ~,
like 指向parent commit:"HEAD^", "acf5673^", "master^", "HEAD~1", "HEAD~"
like 指向grandparent commit:"HEAD^^", "acf5673^^", "master^^", "HEAD~2"
A tree is a lot like a directory on your file system.
git ls-tree HEAD //it lists the files that are in the repository at that point, so that's what the repository thinks is the current set of files. (列出當前repo裡的檔案,簡單的說git ls-tree OOO 是指 “列出给定树对象的内容”)
其中blob是指文字檔或圖檔或...任何以blob儲存的檔案,而tree則是指資料夾
git ls-tree master // 如果HEAD pointer本來就在master branch上,則這個的結果會跟git ls-tree HEAD一樣
git ls-tree HEAD assets/ //列出在asset/裡的資料,且帶有asset/路徑
git ls-tree HEAD 85eded //會列出asset/裡的資料,且不帶有asset/路徑
branch
從master branch創建一個新的分支second_branch,但在新的分支上沒有commit,則即使已經在新的branch上工作,HEAD pointer仍然只像master上的最新commit。
git diff master..second_branch // this differ between the tip of master and the tip of second_feature(描述性說法就是顯示second_branch做了什麼)
git diff master..second_branch^ // this differ between the tip of master and the second tip of second_feature
git branch --merged // 會顯示有merge到當前branch的分支,換句話說,如果在這個分支的commit裡可以找到xxx分支的最新commit,那xxx就會出現在這個cmd結果裡,如果merge過來的分支繼續進行commit,那將不會出現在這裡
git branch --no-merged
git branch -r --merged //查詢remote 裡merged的
git branch --merged HEAD/<branch>/<SHA1> // 查詢特定branch的merged紀錄
git branch -m(或--move) second_feature seo_title // rename branch
git branch -d(或--delete) seo_title // delete branch (注意不能在該分支上刪除該分支)
git branch <new_branch> <remote_branch> //建立新分支追蹤remote branch
同
git checkout -b <new_branch> <remote_branch>
git branch <new_branch> HEAD // 從HEAD pointer建立新分支
merge
git merge --no--ff branch // means "no fast-forward", make a new commit anyway, 當想要留有merge的痕跡時用這個
git merge --ff-only branch // means "If you can't do a fast-forward merge, then just abort"
stash
It's not part of the repository, the staging index or the working directory, it's a special fourth area in Git, seperate from the others.
git stash save "key in stash message, anything you want" // 這個訊息只要給自己看得懂就好,接著working directory and staging index會回到最新的commit,就像git reset hard HEAD.
git stash list // to view what is in the stash,and it can be saved on branch_1, then pull out in branch2
result:
stash@{0}: On feature/chart: edit one line
stash@{1}: On master: Enter
stash@{2}: WIP on fix-token-conflict: 01292c3 Merge branch 'feature/change-deploy-flow' into 'master'
git show stash@{0} // show detailed info
git show -p stash@{0} // show more detailed info (like diff)
but actually when i try the two above, i get the same result.
git stash pop // retrieve the stash, and remove it from the stash
git stash apply // retrieve the stash, and leave it in the stash
if you want to pull the newest one, then you don't key stash@{0} as well.
git stash drop stash@{0} //刪除指定的stash
git stash clear //刪除全部的stash
remote
git remote // 列出remote資訊
git remote -v // 列出更詳細的remote資訊
git remote add <alias> <url> //添加remote
git remote rm <alias> //刪除remote
git push -u <alias> <branch> // -u means "track the remote", so when key "cat .git/config", then we can see [branch "master"]
如果要讓existing untracking branch變成tracking:
- 進入.git/config檔案添加如上方的內容
- git branch branch.<branchName>.remote <remote alias>
git branch branch.<branchName>.merge <file path>
just like ..
git branch branch.master.remote origin
git branch branch.master.merge refs/heads/master - git branch --set-upstream <branch> <remotePath>
just like ..
git branch --set-upstream master origin/master
git push <alias> :<remote_branch_name> // delete a remote branch
實際上是git push <alias> <local_branchName>:<remote_branchName> 這個是push local branch to remote branch,結果把local branch拿掉,就變成,把nothing push to remote branch所以就變成delete
like ..
git push origin :master // notice! Not origin/master, just master!
還有另一個delete way, this is more intuitive
git push <alias> --delete <remote_branch_name>
"git push origin master" will push any changes in the origin/master branch to the origin repository.
"git fetch origin master" will fetch the remote to origin/master
origin/master is a local remote-tracking branch created by git, it's different from master in local until we do merge.
Q: Use this command to tell your local repository where it can find the remote repository.
A: git remote add nameofRepo URL.
git branch -r // show you the remote branches
git branch -a //show you local and remote branches
git clone <https url> <name> //clone and rename the folder, and "clone" will track the remote branch
Prune
Pruning means delete all stale remote-tracking branches, like "origin/Bugfix:xxx".
- Deleting a remote prunes the remote-tracking branch automatically.
- Necessary when collaborators delete branches.
- Fetch does not automatically prune.
git remote prune <alias> //直接刪除remote-tracking branches
git remote prune <alias> --dry-run //--dry-run讓我們知道當前指令會做哪些事情
git fetch --prune, git fetch -p(shortcut) // if you do want fetch and prune at the same time, this cmd can do it.
git config --global fetch.prune true // always prune before fetch
#Prune all unreachable objects
#Do not need to use!
git prune //it totally differ from what we say above. It's part of the basic garbage collection that's done by git.
# Part of the garbage collection
git gc // clean up my repo, and throw away all the stuff that's not being used.
Tag
git tag issue136 655da716 // 添加輕量標籤
git tag -a v1.1 -m "xxx" <SHA1> // 添加帶註釋(annotated)的標籤,-a means annotated, -m means message, message can be one line or multi-line, and here v1.1 is the name of the tag, this is most common cmd to use, fi nally if we omit the SHA1, git would use the current head by default.
git tag --list/-l/什麼都不用打,但這個可能會混淆,所以不推薦 //List tags
git tag -l "v2*" // List tags begining with "v2"
git tag -l -n // List both tag name and tag annotation. By default, it's going to list just one line of the annotation. You can also put a number right after the n if you want to see more than one line from the annotation.
#Work with tags like SHAs
git show v1.1
git diff v1.0..v1.1
git tag --delete/-d v1.1 // 刪除tag
- git push does not transfer tags
- Tags must be explicitly transferred
- git fetch automatically retrieves shared tags.
#Push a tag to a remote server
git push <alias> <tag> // push single tag, like push a branch
git push <alias> --tags //push all tags
git push <alias> :<tag>, git push --delete/-d <alias> <tag> //delete remote tags like remote branches
git fetch // fetch commits and tags
git fetch --tags // fetch only tags(with necessary commits), this is rarely used.
tag checkout
tag checkout
- tags can be checked out, just like any commit
- git checkout -b new_branch <tag>
- git checkout <tag> // this will in "detached HEAD state"
what is detached?
- Checking out a commit puts the local repo in a "detached HEAD state"
- Like being on an unnamed branch
- New commits will not belong to any branch
- Detached commits will be garbage collected (~2 weeks)
- Once we checkout to other branch, we'll have a hard time getting back to those commits again
solution to detached
- git tag <tag> // Tag the commit(HEAD detached)
- git branch <branch> // Create a branch (HEAD detached)
- git checkout -b <branch> Create a branch and move the HEAD to the branch(reattach HEAD), this one is best way
interactive staging
It's like feature of many git GUI tools, but you don't have to go to a third party tool.
git add --interactive/-i // the way you enter interactive staging mode

you can type 1 or s to get the state
Every cmd means like below
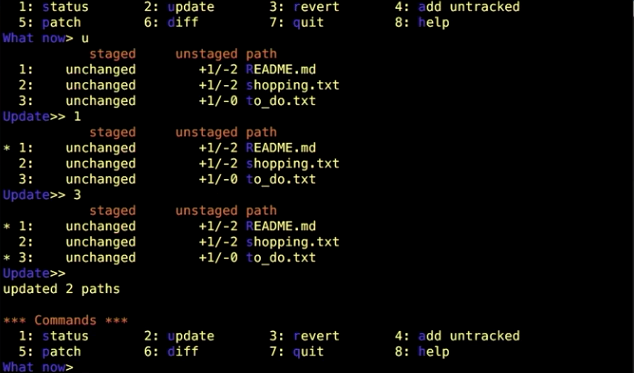
1 or s: status
2 or u: add // 先輸入2/u進入模式,選擇欲加入的修改的編號,以上方為例則為1~3,enter後再不輸入任何字在enter一次則完成,如下圖


Patch mode can also be reached by use directly in command line, like...
It's like feature of many git GUI tools, but you don't have to go to a third party tool.
git add --interactive/-i // the way you enter interactive staging mode
you can type 1 or s to get the state
Every cmd means like below
1 or s: status
2 or u: add // 先輸入2/u進入模式,選擇欲加入的修改的編號,以上方為例則為1~3,enter後再不輸入任何字在enter一次則完成,如下圖
3 or r: unstage, like git checkout -- xxx.vue
4 or a: list untracked file, if you want to track it, then key in number
and 6/d, 7/q, 8/h 就如字面意思,操作也差不多
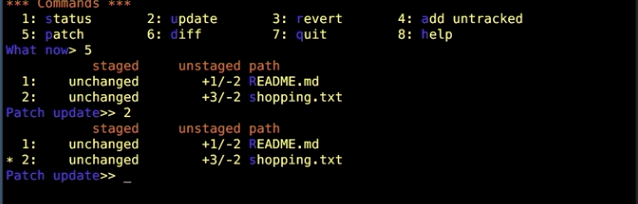
5 or p : It's one of the most useful feature. Before when we were doing add from the command line or from interactive mode when we used update, we were staging an entire file. Patch mode allows us to just stage portions of a changed file. Those portions are going to be referred to as hunks. "Hunk":an area where two files differ. Hunks can be staged, skipped, or split into smaller hunks.
we can see there are 3 line plus and 2 line delete in shopping.txt
patch mode decide to the above as a portion/hunk, which has 2 plus and 2 delete
there are a lot, but the main is y or n here.
Besides, s can split the hunk if there is unchanged line between modified portion.
If there is not unchanged line, we should use e.
we key in n first, then git continue to ask next, which has a plus line, and this time we key in y
Finally, we can see the staged mode become 1 plus, and unstaged mode still have 2 plus and 2 delete.
git add --patch
git add -p
git stash -p
git reset -p
git checkout -p
git commit -p
when git ask "stage this hunk"? we use e(manually edit the current hunk), write like below
 In the text editor, there must be "-","+", or " " in front of every line.
Cherry-Picking Commits
像 echo "Hello" > temp.txt
git diff <from-commit> <to-commit> > output.diff // 最後是要寫路徑
git diff <from-commit>..<to-commit> > output.diff //也可以用..


Apply Diff Patches
不能在就有該.patches的branch上使用

Create formatted patches
git format-patch <SHA1>..<SHA1> //Export all commits in the range
git format-patch master //Export all commits on current branch, which are not in master branch
git format-patch -1 <SHA1> // Export a single commit
git format-patch master -o <directory> // 把產生的檔案放入該資料夾,資料夾不存在git會自動產生它
git format-patch <SHA1>..<SHA1> --stdout > feature.patch // 其中stdout means "standard out",以此方法全部的commit會產生在一個.patch裡
Apply Formatted Patches
不能在就有該.patches的branch上使用
Rebase
After rebasing, the relative commits's SHAs will change because the parent commits's change
git rebase master // rebase current branch to tip of master
git rebase master new_feature // rebase new_feature to tip of master, what this do is checkout out new_feature automatically and do regular rebasing
git merge-base master new_feature // return commit(SHA1) where topic branch diverges,回傳diverged branches's common ancestor
git log --graph --all --decorate --oneline //Useful for visualizing branches
看以下例子:

第一張圖後,執行 git merge-base master camping, 會得到e24cf05
第二張圖後,執行 git merge-base master camping, 會得到676da05
How to choose merge vs rebase?
git rebase --continue // After solve the conflict when rebasing, use “git add .”and this command to go ahead. Remember that we don't use commit command here, because rebasing don't create commit.
git rebase --skip //throw out this current commit, I don't want to rebase this one, but I do want you to keep going with the rest of commits in the chain. Most often, you'll want to use the skip option, when the underlying code already contains the change that's in your conflicting commit and you'd like to use the existing one instead of yours.
git rebase --abort // 回到rebase之前的情況


git rebase --onto <newbase> <upstream> <branch>
like..
git rebase --onto master ecommerce new_feature //成功後,會變成在 new_feature branch 上,master 接new_feature(new_feature is the tip of the branch)
git rebase --onto new_feature master ecommerce //成功後,會變成在ecommerce branch 上,new_feature 接ecommerce(ecommerce is the tip of the branch), but this will be same as "git rebase new_feature ecommerce "
Undo a rebase
#Undo, unless ORIG_HEAD has changed again
#(rebase, merge, reset change ORIG_HEAD)
git reset --hard ORIG_HEAD // ORIG_HEAD means "original head"
#Undo by rebasing to former merge-base SHA
git rebase --onto <SHA1>/<branch> master new_feature
我想這是因為rebase是破壞性的,所以再把接過去也沒問題
Interactive rebase
git rebase --interactive/-i master new_feature // get into interactive mode

git pull --rebase=preserve
Log options
git log -p/--patch // List commits as patches (diffs)
git log -L 100,150:xxx.txt // List edits to lines 100-150 in xxx.txt
進入編輯模式後,不只可以f,b,...,還可以"/欲搜索的字串" 接著enter,再用“n”尋找下一個,“N”回到上一個
Blame
列出誰攥寫了程式
git blame xxx.txt // Annotate file with commit details
git blame -w filename.txt //Ignore whitespace
git blame -L 100,150 xxx.txt // Annotate lines 100-150
git blame -L 100,+5 xxx.txt // Annotate lines 100-105
git blame <SHA1> xxx.txt // Annotate file at revision <SHA1>
git blame <SHA1> -- xxx.txt // Same as last one, if you use other options at the same time, the double dashes would be neccesary.
git config --global alias.praise blame // Add a global alias for "praise", someone says praise like blame,設定了這句後,git praise xxx.txt會得到與git blame xxx.txt相同的結果
git annotate xxx.txt //Similar to blame, different output format(就比blame多了兩欄大間距)

Bisect
用二分法找出問題commit
git bisect reset //when you are done, use it to finish


when git ask "stage this hunk"? we use e(manually edit the current hunk), write like below
Cherry-Picking Commits
- Apply the changes from one or more existing commits.
- Each existing commit is record as a new commit on the current branch
- Conceptually similar to copy-paste
- New commits have different SHAs
- cannot cherry pick a merge commit // Besides, to cherry pick a remote commit is ok
- Use -edit, -e to edit the commit message
- Can result in conflicts which must be resolved
#這大概需要message很明確,且用在ReadMe.txt之類吧
git cherry-pick <SHA1> // 取用那個SHA1的動作
git cherry-pick <SHA1>..<SHA1> // 取用兩個SHA1間的所有動作
if there is in conflict...
- solve the conflict in text editor and save
- git add .
- git cherrypick --continue, it will pop up the editor to let you edit the commit message, after you do it, close it
Create Diff Patches
- Share changes via files
- Useful when Changes are not ready for a public branch
- Useful when collaborators do not share a remote
- Discussion, review, approval process
git diff <from-commit> <to-commit> > output.diff // 最後是要寫路徑
git diff <from-commit>..<to-commit> > output.diff //也可以用..
如果要取最新兩個commit,需要寫最新第三個到最新一個
再把.diff拖入 editor就可以看見diff的結果
Apply Diff Patches
不能在就有該.patches的branch上使用
- Apply changes in a diff patch file to the working directory
- Makes changes, but not commits
- No commit history transferred
git apply output.diff //如果會產生衝突,則這指令就不可執行,會error,可以執行的話,git不會產生任何資訊,可以用git status看變化,變化會留在working directory
Create formatted patches
- Export each commit in Unix mailbox format
- Useful for email distribution of changes
- Includes commit messages
- One commit per file by default
git format-patch <SHA1>..<SHA1> //Export all commits in the range
git format-patch master //Export all commits on current branch, which are not in master branch
git format-patch -1 <SHA1> // Export a single commit
git format-patch master -o <directory> // 把產生的檔案放入該資料夾,資料夾不存在git會自動產生它
git format-patch <SHA1>..<SHA1> --stdout > feature.patch // 其中stdout means "standard out",以此方法全部的commit會產生在一個.patch裡
Apply Formatted Patches
不能在就有該.patches的branch上使用
- Extract author, commit message, changes from a mailbox message and apply them to current branch
- Similar to cherry-picking:same changes, different SHAs //因為branch不同
- Commit history is transferred
git am < path of .patch > // apply single patch. And am means "apply mailbox" or "apply mailbox formatted patch"
git am dir/*.patch //apply all patch in a directory
#和.diff不同的是,.patch有commit,所以apply後直接增加commit不會留在working directory
Rebase
After rebasing, the relative commits's SHAs will change because the parent commits's change
git rebase master // rebase current branch to tip of master
git rebase master new_feature // rebase new_feature to tip of master, what this do is checkout out new_feature automatically and do regular rebasing
git merge-base master new_feature // return commit(SHA1) where topic branch diverges,回傳diverged branches's common ancestor
git log --graph --all --decorate --oneline //Useful for visualizing branches
看以下例子:
第一張圖後,執行 git merge-base master camping, 會得到e24cf05

第二張圖後,執行 git merge-base master camping, 會得到676da05
- No additional merge commit
- Destructive: SHA changes, commits are rewritten
- No longer a complete record of what happened and when
- Tricky to undo
- Thou shalt no rebase a public branch
How to choose merge vs rebase?
- Merge to allow commits to stand out or to be clearly grouped
- Merge to bring large topic branches back into master
- Rebase to add minor commits in master to a topic branch
- Rebase to move commits from one branch to another
- Merge anytime the topic branch is already public and being used by others
這兩個做起來複雜度應該都一樣的,下次可以rebase試一下
git rebase --continue // After solve the conflict when rebasing, use “git add .”and this command to go ahead. Remember that we don't use commit command here, because rebasing don't create commit.
git rebase --skip //throw out this current commit, I don't want to rebase this one, but I do want you to keep going with the rest of commits in the chain. Most often, you'll want to use the skip option, when the underlying code already contains the change that's in your conflicting commit and you'd like to use the existing one instead of yours.
git rebase --abort // 回到rebase之前的情況
git rebase --onto <newbase> <upstream> <branch>
like..
git rebase --onto master ecommerce new_feature //成功後,會變成在 new_feature branch 上,master 接new_feature(new_feature is the tip of the branch)
git rebase --onto new_feature master ecommerce //成功後,會變成在ecommerce branch 上,new_feature 接ecommerce(ecommerce is the tip of the branch), but this will be same as "git rebase new_feature ecommerce "
Undo a rebase
#Undo, unless ORIG_HEAD has changed again
#(rebase, merge, reset change ORIG_HEAD)
git reset --hard ORIG_HEAD // ORIG_HEAD means "original head"
#Undo by rebasing to former merge-base SHA
git rebase --onto <SHA1>/<branch> master new_feature
我想這是因為rebase是破壞性的,所以再把接過去也沒問題
Interactive rebase
git rebase --interactive/-i master new_feature // get into interactive mode
- pick 接受使用commit,不做其他動作
- reword 接受使用commit,但要改message
- edit 接受使用commit,但要改code內容
- squash: conbine change sets, concatenate messages
- fixup: conbine change sets, discard messages
#If the commit has more than one user, using first author in the commit series
squash 和 fixup 的例子如下,要搭配git rebase -i HEAD~n使用
#Rebase last 3 commits onto the same branch
#but with the opportunity to modify them
git rebase -i HEAD~3
#接著會開啟編輯器,原本三個都會是pick,在手動改成想要的
存儲關閉後,git運行一段程式後,會再開啟編輯器內容關於message,同樣修改後,即完成
Pull Rebase
- Keeps history cleaner by reducing merge commits //這就是他的主要目的!
- Only use on local commits which have not yet shared to a remote
git pull --rebase=preserve
Log options
git log -p/--patch // List commits as patches (diffs)
git log -L 100,150:xxx.txt // List edits to lines 100-150 in xxx.txt
進入編輯模式後,不只可以f,b,...,還可以"/欲搜索的字串" 接著enter,再用“n”尋找下一個,“N”回到上一個
Blame
列出誰攥寫了程式
git blame xxx.txt // Annotate file with commit details
git blame -w filename.txt //Ignore whitespace
git blame -L 100,150 xxx.txt // Annotate lines 100-150
git blame -L 100,+5 xxx.txt // Annotate lines 100-105
git blame <SHA1> xxx.txt // Annotate file at revision <SHA1>
git blame <SHA1> -- xxx.txt // Same as last one, if you use other options at the same time, the double dashes would be neccesary.
git config --global alias.praise blame // Add a global alias for "praise", someone says praise like blame,設定了這句後,git praise xxx.txt會得到與git blame xxx.txt相同的結果
git annotate xxx.txt //Similar to blame, different output format(就比blame多了兩欄大間距)
最初的兩個會是這個commit最初的建立
Bisect
用二分法找出問題commit
- Find the commit that introduced a bug or regression(復原)
- Mark last good version and first bad version
- Resets code to mid-point
- Mark as good or bad revision
- Repeat
1. 首先開始並選定範圍
git bisect start
git bisect bad <treeeish> //不寫treeish則為head pointer所在
git bisect good <treeeish>
2. git會自動二分版本並checkout到該版本,如果經測試後該版本沒問題則輸入git bisect good,有問題則輸入git bisect bad,如此重複執行直到找出問題的commit
3. 結束
git bisect reset //when you are done, use it to finish
console.log(0 && hi) // 0
console.log(0 && hi) // 0
解析:
如果單純用&&判斷兩個值,他會當第一個是false時就丟第一個值回來,他會當第一個是true時就丟第二個值回來,如下
console.log(0 && true) // 0
console.log(true && 5) // 5
console.log(10 && 5) // 5
console.log(0 && 5) // 0
而平常我們用 if 將它回傳的值在做 Boolean 的轉換,結果才會是我們平常看見的true or false
解析:
如果單純用&&判斷兩個值,他會當第一個是false時就丟第一個值回來,他會當第一個是true時就丟第二個值回來,如下
console.log(0 && true) // 0
console.log(true && 5) // 5
console.log(10 && 5) // 5
console.log(0 && 5) // 0
而平常我們用 if 將它回傳的值在做 Boolean 的轉換,結果才會是我們平常看見的true or false
async await
async function(){ // 如果沒有async,在function內什麼都沒寫的情況下console.log他會印出undefined。如果有async,console.log的話會是promise
//....
var s1 = await axios...
console.log(s1) . // 可以直接在這裡取得api 的res,而會不是undefined, null之類的
}
但async await需要babel才可以在各大瀏覽器支持,babel解析出來其實就是promise.then,只是太多{}寫起來醜,所以加入async await
// utilities/api-handler.lib.ts
// api/chart.ts
//....
var s1 = await axios...
console.log(s1) . // 可以直接在這裡取得api 的res,而會不是undefined, null之類的
}
但async await需要babel才可以在各大瀏覽器支持,babel解析出來其實就是promise.then,只是太多{}寫起來醜,所以加入async await
// utilities/api-handler.lib.ts
import axios, { AxiosResponse, AxiosRequestConfig } from 'axios';
import { requestSuccess, requestFail, responseSuccess, responseFail } from './error-handler.lib';
import Vue from 'vue';
class HttpModel {
constructor() {}
/**
* axios API handler
* @author rourou
* @description 一律透過此method呼叫api
*/
async request<T>(cfg: AxiosRequestConfig, isLogin = false) {
const host = window.location.hostname.split('.');
cfg.baseURL = `${Vue.$clientSideProcess.env.VUE_APP_API_URL}.${host[1]}.${host[2]}.${host[3]}/api/${Vue.$clientSideProcess.env.VUE_APP_API_VERSION}/${Vue.$clientSideProcess.env.VUE_APP_CLIENT_ID}/`;
// cfg.baseURL = `http://192.168.50.175/api/v1/222222`;
if (process.env.NODE_ENV === 'development') {
cfg.baseURL = `/backoffice/api/${Vue.$clientSideProcess.env.VUE_APP_API_VERSION}/${Vue.$clientSideProcess.env.VUE_APP_CLIENT_ID}/`;
}
if (isLogin) {
cfg.headers = {
'content-type': 'application/x-www-form-urlencoded',
};
} else {
cfg.headers = {
Authorization: `Bearer ${localStorage.getItem(window.location.hostname)}`,
'content-type': 'application/x-www-form-urlencoded',
};
}
const instance = axios.create();
instance.interceptors.request.use(config => requestSuccess(config), err => requestFail(err));
instance.interceptors.response.use(response => responseSuccess(response), error => responseFail(error));
let result;
try {
result = await instance.request<T>(cfg);
return Promise.resolve(result);
} catch (throwError) {
return Promise.reject(throwError);
}
}
}
const model = new HttpModel();
export default model;
// api/chart.ts
import Handler from '@/utilities/api-handler.lib';
import * as Model from '@/models/interfaces/chart';
import * as Qs from 'qs';
export default {
/**
* @description
*/
async getTopup(payload: Model.IAPeriodOfTimeRequest): Promise<Model.ITopUpResponse> {
const config = {
url: `/report/topup/stats?${Qs.stringify(payload)}`,
method: 'get',
};
const result = await Handler.request<Model.ITopUpResponse>(config);
return <Model.ITopUpResponse>result.data;
},
async getFirstTopup(payload: Model.IAPeriodOfTimeRequest): Promise<Model.IFirstTopup> {
const config = {
url: `/report/topup/first-topup/stats?${Qs.stringify(payload)}`,
method: 'get',
};
const result = await Handler.request<Model.IFirstTopup>(config);
return <Model.IFirstTopup>result.data;
},
/**
* @description
*/
async getOnlineUsersNumber(): Promise<Model.IGetOnlineUsersNumber> {
const config = {
url: `/report/users/online`,
method: 'get',
};
const result = await Handler.request<Model.IGetOnlineUsersNumber>(config);
return <Model.IGetOnlineUsersNumber>result.data;
},
async getWithdrawal(payload: Model.IAPeriodOfTimeRequest): Promise<Model.IWithdrawalResponse> {
const config = {
url: `/report/withdrawal/stats?${Qs.stringify(payload)}`,
method: 'get',
};
const result = await Handler.request<Model.IWithdrawalResponse>(config);
return <Model.IWithdrawalResponse>result.data;
},
async getBetsSum(payload: Model.IGameBetSumRequest): Promise<Model.IGameBetSumResponse> {
const config = {
url: `/report/game-bets-sum?${Qs.stringify(payload)}`,
method: 'get',
};
const result = await Handler.request<Model.IGameBetSumResponse>(config);
return <Model.IGameBetSumResponse>result.data;
},
};
訂閱:
意見 (Atom)